How to test lawn soil at home is a critical skill for homeowners and property managers who want consistent turf performance. Soil conditions determine how well grass absorbs nutrients, retains moisture, and resists stress. Without accurate testing, fertilization and irrigation become guesswork.
Many lawn problems originate below the surface. Poor pH balance, nutrient deficiencies, and compaction issues often go unnoticed until turf begins to decline. A structured soil testing routine allows property owners to identify problems early and apply targeted corrections.
This guide explains professional-level testing methods you can perform at home with reliable accuracy.

Why Soil Testing Matters for Lawn Health
This YouTube video from Home Lawn Care with Greg Phillips explains how soil testing improves lawn health and saves money. It shows how test results guide fertilizer and treatment choices. The insights help readers make smarter, cost-effective lawn care decisions.
Healthy turf depends on balanced soil chemistry and structure. Grass cannot absorb nutrients efficiently when soil conditions remain outside optimal ranges.
Soil testing helps you determine:
- pH balance
- Nutrient availability
- Organic matter levels
- Soil texture
- Compaction indicators
Accurate testing prevents unnecessary fertilizer applications and improves long-term lawn performance. Learning how to test lawn soil at home allows you to manage turf with precision rather than assumption.
What Soil Testing Reveals About Your Lawn
Soil analysis provides a clear picture of the root-zone environment. Each component influences turf growth in different ways.
pH Level
Soil pH controls nutrient availability. Most turfgrass varieties perform best within a pH range of 6.0 to 7.0. When pH falls outside this range, grass struggles to absorb essential nutrients.
Nutrient Levels
Nitrogen, phosphorus, and potassium form the core of lawn fertility. Soil testing also measures micronutrients such as iron and magnesium.
Soil Texture
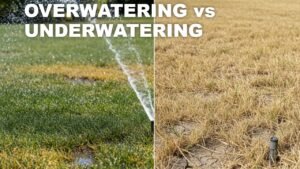
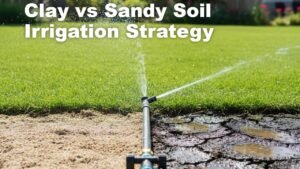
Soil composition influences drainage and water retention. Sandy soil drains quickly. Clay soil retains moisture but compacts easily.
Understanding these factors improves the accuracy of any lawn care program.
Tools Needed to Test Lawn Soil at Home
This YouTube video below from Ryan Knorr Lawn Care explains an easy method for soil testing your lawn. It shows how to collect samples and interpret basic results. The guidance helps readers adjust nutrients and improve overall turf health.
Testing does not require expensive equipment. Several affordable tools deliver reliable results.
Basic tools include:
- Soil probe or shovel
- Clean bucket
- Sample bags
- Home soil test kit
- Distilled water
- Measuring container
Optional tools for advanced testing:
- pH meter
- Soil thermometer
- Moisture meter
Gathering proper tools ensures accurate sampling when learning how to test lawn soil at home.
Step-by-Step: How to Test Lawn Soil at Home
Professional results depend on proper sampling technique. Follow a structured process for accurate data.
Step 1: Choose the Right Time
Test soil during active growing seasons. Spring and fall provide the most accurate readings. Avoid testing immediately after fertilization or heavy rainfall.
Step 2: Collect Multiple Samples
Take soil samples from several areas of the lawn. Combine them to create a representative mix.
Sampling guidelines:
- Remove surface debris
- Dig 3–4 inches deep
- Collect 8–10 samples
- Mix thoroughly in a bucket
Multiple samples ensure reliable results across the property.
Step 3: Prepare the Sample
Allow soil to air-dry before testing. Remove stones, roots, and debris. Break apart large clumps to create a uniform texture.
Proper preparation improves accuracy when performing how to test lawn soil at home procedures.
Using a Home Soil Test Kit
This YouTube video below from GrowOrganic Peaceful Valley explains how to use soil test kits at home. It walks through sample collection, testing steps, and reading results. The guidance helps readers understand soil nutrients and make informed lawn or garden decisions.
Home testing kits measure pH and nutrient levels quickly. Follow manufacturer instructions carefully for best results.
Basic Testing Process
- Place soil in testing container
- Add testing solution or powder
- Shake or mix thoroughly
- Wait for color change
- Compare results with chart
Color-coded kits provide approximate nutrient levels and pH readings. These results guide fertilizer and amendment decisions.
Testing Soil pH at Home
Soil pH influences nutrient absorption more than any other factor.
Using a Chemical Test Kit
Most kits include a pH indicator solution. Add soil and distilled water to the container. Insert the testing solution and compare color results.
Using a Digital pH Meter
Digital meters provide faster readings. Insert the probe into moist soil and wait for the display to stabilize.
Regular pH testing ensures balanced nutrient availability. Understanding pH is central to mastering how to test lawn soil at home.
Testing Soil Texture by Hand
Soil texture affects water retention and drainage. A simple hand test reveals composition.
Hand Texture Test
- Moisten a soil sample
- Roll into a ball
- Press between fingers
Results:
- Sandy soil crumbles easily
- Clay soil forms sticky ribbons
- Loamy soil feels balanced
Texture testing complements nutrient analysis.
Checking Soil Compaction
Compacted soil restricts root growth and oxygen flow. Testing compaction helps identify structural issues.
Simple Compaction Test
Insert a screwdriver into the soil.
- Easy penetration indicates loose soil
- Strong resistance suggests compaction
Compaction often requires aeration to restore structure.
Interpreting Soil Test Results
Understanding results allows you to make informed adjustments.
Low pH (Acidic Soil)
Apply lime to raise pH gradually.
High pH (Alkaline Soil)
Use sulfur-based amendments to lower pH.
Low Nitrogen
Apply balanced fertilizer during growing season.
Low Organic Matter
Incorporate compost to improve soil structure.
Correct interpretation transforms data into action.
How Often to Test Lawn Soil
Regular testing keeps lawn care programs accurate.
Recommended schedule:
- Once per year for established lawns
- Twice per year for problem areas
- Before major renovation projects
Frequent testing ensures consistent turf performance.
Benefits of Testing Soil at Home
Learning how to test lawn soil at home offers several advantages.
Key benefits include:
- Reduced fertilizer waste
- Improved turf health
- Better irrigation efficiency
- Early detection of problems
- Lower maintenance costs
Home testing provides valuable data without waiting for laboratory results.
When to Use Professional Soil Testing
Home kits provide general guidance. Laboratory testing delivers more detailed analysis.
Consider professional testing when:
- Severe turf decline occurs
- Renovation is planned
- Nutrient imbalances persist
- Large properties require precision
Combining home testing with occasional lab analysis offers the best results.
Practical Tips for Accurate Soil Testing
Follow best practices to improve reliability.
- Use clean tools
- Avoid contamination
- Test multiple areas
- Record results
- Adjust gradually
Consistency improves accuracy over time.
Frequently Asked Questions
How accurate are home soil test kits?
Home kits provide reliable estimates for pH and nutrient levels. Laboratory tests offer greater precision.
Can I test soil after fertilizing?
Wait at least four weeks after fertilization to avoid skewed results.
What pH is best for most lawns?
Most turfgrass performs best between pH 6.0 and 7.0.
Should I test soil every year?
Yes. Annual testing helps maintain balanced nutrient levels.
Do different areas need separate tests?
Yes. Test front and backyard areas separately if conditions differ.
Conclusion
Healthy lawns begin with informed soil management. Testing reveals critical information about nutrient levels, pH balance, and soil structure. Without accurate data, even the best lawn care programs struggle to deliver consistent results.
Learning how to test lawn soil at home empowers homeowners and property managers to manage turf with precision. Regular testing reduces waste, improves efficiency, and supports long-term lawn health.
Evaluate your soil conditions carefully, apply targeted amendments, and continue refining your testing routine to maintain a strong, resilient lawn season after season.