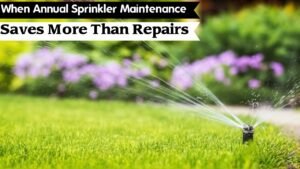
Introduction: Sprinkler System Was Repaired Incorrectly
The most common signs of a sprinkler system repaired incorrectly include high-pressure misting, water pooling at the base of new heads, ‘water hammer’ sounds in the pipes, and non-waterproof wire nuts in the valve box. Homeowners who recently had irrigation work done can use this guide to identify visual, hydraulic, and electrical red flags, ensuring repairs were performed professionally.
The “Tailgate Warranty” Trap
After a repair, many homeowners feel relieved—until the system fails a week later. A “patched” repair may hide deeper hydraulic or structural issues, leading to leaks, uneven coverage, and turf rot. Professionals focus on Pressure-Regulated Stem (PRS) solutions and hydraulic integrity, while amateur fixes often just mask symptoms.
Understanding what to inspect—and how—protects your investment and prevents unnecessary repeat service calls.

Visual Signs of a Bad Sprinkler Repair
Why Misting is Proof of a Half-Finished Repair
Misting is often caused by high water pressure or an incorrect nozzle. If your repair didn’t include a PRS head or matched Nozzle GPM (Gallons Per Minute), water sprays unevenly. One area floods while others stay dry—a classic amateur mistake.
Quick Check: Turn on the system and watch for misting. Persistent fine spray signals the repair wasn’t properly executed.
Why Your New Sprinkler Head is Wobbly or Leaning (The Swing Joint Issue)
Sprinkler heads should be installed with Swing Joint assemblies to prevent snapping when hit by mowers or foot traffic. Direct PVC connections often fail quickly.
Mower Test: After the first watering, inspect head height. If it settled 2 inches lower, the soil wasn’t compacted correctly. This causes clogs, scalping, and premature failure.
The Meter Test: How to Spot a Silent Repair Failure
Invisible leaks can occur after poor repairs. Turn off all water inside your house and observe the water meter. If the “low flow” indicator or triangle spins while sprinklers are off, the repair likely left a leaking lateral line or a weeping valve untouched.
Improper PVC Solvent Welding
Proper solvent welding requires Purple Primer and the correct glue. Bad repairs may involve dry-fitting or clear-only glue. Excessive globs can cause friction loss, clogs, or premature pipe failure. Inspect visible joints for primer presence and cleanliness.
Electrical Red Flags
The Cleanliness Indicator
A professional repair includes cleaning the valve box. Mud covering the solenoids signals that the technician didn’t check for weeping valves or slow leaks. A clean, organized box is the hallmark of an expert who verified airtight seals.
Why Non-Waterproof Wiring Fails
Open or non-waterproof wire connections often fail. Use a multimeter to check solenoid Ohms: professional installations should read 20–60 Ohms. Infinite or below 20 Ohms indicates poor splicing or wrong solenoid type.
Hydraulic Red Flags
- Seepage at the Base: Indicates worn neck seals or poorly threaded heads.
- Water Hammer: Thumping pipes often result from incorrect valve type, missing PRS head, or insufficient air-bleeding.
- Unflushed Zones: New heads must be flushed; debris left inside clogs the nozzle immediately.
Low Head Drainage: Check Valve (SAM) Importance
If water leaks from the lowest head for more than 10 minutes after the system shuts off, the repair likely missed installing a Sod-A-Matic (SAM) Check Valve. This is more than a nuisance; it signals the repair ignored Elevation-Based Hydraulics, leading to wasted water and potential lateral line collapse over time.
Did They Skip the Backflow Test? The Legal Risk of a Cheap Repair
Backflow prevention is critical for Cross-Connection Control and avoiding Downstream Contamination. Hack repairs sometimes bypass or remove the check valve. Low Head Drainage plus missing documentation signals a non-compliant repair. Professionals also file municipal compliance reports, protecting you from fines.
5 Immediate Signs of a Failed Sprinkler Repair
- Persistent misting or uneven spray.
- Water puddles at newly repaired heads.
- Valve box wiring exposed, corroded, or muddy.
- Heads that sink, wobble, or lean.
- Audible water hammer or pressure spikes in pipes.
Pro vs. Amateur Repair: Quick Comparison
| Feature | Professional Repair | Amateur / Incorrect Repair |
|---|---|---|
| Connection Type | Flexible Swing Pipe (Funny Pipe) | Rigid “Nipple” or Direct-to-Tee |
| Wiring | Waterproof DBY/DBR connectors, clean box | Standard tape/wire nuts, muddy box |
| Pressure | Integrated PRS | High-pressure misting |
| Nozzle Type | Matched Precipitation Rate (MPR), correct GPM | Mismatched or generic nozzle |
| Cleanup | Soil compacted & turf replaced | Open holes or sunken earth |
| Solvent Welding | Purple Primer + Proper Glue | Dry Fit or only clear glue |
| Check Valve | SAM Installed | Missing SAM, Low Head Drainage |
How to Test if Your Repair Was Done Correctly
- Spray Uniformity: Check for misting or uneven coverage.
- Meter Check: Verify no water flows while sprinklers are off.
- Electrical Test: Multimeter reads 20–60 Ohms at solenoids.
- Head Stability: Inspect height and alignment post-watering.
- Water Hammer: Listen for thumping; indicates pressure or valve issues.
- Backflow Function: Confirm Low Head Drainage is controlled with SAM Check Valve.
- Photo Documentation: Ask for a quick photo of the underground connection before burial. Reputable contractors will provide this to show Swing Pipe and Purple Primer joints were correctly installed.
FAQ
Q: Why is my sprinkler head still leaking after being replaced?
Underlying hydraulic or PRS issues were likely ignored. The head alone isn’t the problem.
Q: Is it normal to have a puddle around a new sprinkler head?
No. It indicates improper threading, sunken heads, or failed seals.
Q: How long should a sprinkler repair last?
A professional repair with Schedule 40 PVC and PRS heads should last 5–10 years. Failures within 90 days suggest improper installation.
Q: What should I do if my irrigation contractor did a bad job?
Document issues, take photos, and request a corrective visit. Certified professionals are the best option for persistent problems.
Final Verdict:
A sprinkler repair isn’t complete until visual, hydraulic, and electrical standards are verified. Use PRS heads, Swing Joints, solvent welding, MPR matching, SAM Check Valves, and clean valve boxes as your audit checklist.
Request a comprehensive 15-point post-repair audit to establish your system’s baseline efficiency, verify proper installation, and prevent repeat issues. Early inspection saves water, protects your lawn, and avoids unnecessary service calls.