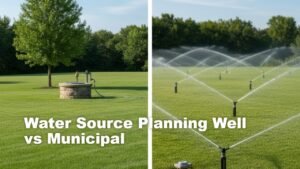
Irrigation blueprint example planning is the foundation of every efficient irrigation system. A detailed blueprint ensures accurate sprinkler placement, correct pipe sizing, balanced pressure, and proper zoning. Without a clear design, even quality components fail to perform effectively.
Homeowners and property managers often install irrigation systems without formal plans. This leads to uneven coverage, pressure drops, and costly revisions. A professional layout prevents those mistakes before installation begins.
This guide walks you through a complete irrigation blueprint example, including zoning diagrams, hydraulic calculations, and system layout strategies. By the end, you will understand how to create or review a professional irrigation plan with confidence.
 1")
What Is an Irrigation Blueprint?
This YouTube video below from Justin White walks through a sample irrigation plan review. It highlights layout checks, coverage, and system efficiency. The overview helps readers understand how to evaluate an irrigation design before installation.
An irrigation blueprint is a scaled design drawing that outlines every component of the system. It includes:
- Property boundaries
- Sprinkler locations
- Pipe routing
- Valve placement
- Water source connection
- Controller location
- Zone divisions
An irrigation blueprint example provides visual clarity. Contractors, property managers, and installers use it to ensure accurate installation and future maintenance.
Why Every Irrigation Project Needs a Blueprint
A well-prepared irrigation plan eliminates guesswork.
Prevents Installation Errors
Without a layout plan, sprinkler spacing often becomes inconsistent. Dry spots and overspray develop quickly.
Ensures Hydraulic Balance
Correct pipe diameter and zone sizing maintain stable pressure. A blueprint allows designers to calculate flow rates before installation.
Supports Long-Term Maintenance
Clear documentation helps technicians locate valves, pipes, and wiring later.
An irrigation blueprint example demonstrates how structure improves performance and longevity.
Key Components of an Irrigation Blueprint
Every professional plan includes specific technical details.
Property Layout and Measurements
The blueprint begins with a scaled property map. Include:
- Lawn dimensions
- Hardscape areas
- Driveways and sidewalks
- Trees and planting beds
- Slopes and elevation changes
Accurate measurements ensure precise sprinkler placement.
Sprinkler Head Placement
This YouTube video below from Learning With Rich explains how to place a sprinkler head in Revit MEP 2018. It walks through placement tools, alignment, and basic setup steps. The overview helps readers understand sprinkler layout in building design software.
Sprinklers must follow head-to-head coverage principles. Each head’s spray radius should reach the adjacent head.
Common head types include:
- Spray heads for small areas
- Rotor sprinklers for large turf
- Drip lines for planting beds
An irrigation blueprint example clearly marks arc adjustments and spacing distances.
Pipe Network Design
Blueprints show both mainlines and lateral lines.
- Mainlines carry water from the source
- Lateral lines distribute water to sprinklers
Pipe sizing calculations prevent friction loss and pressure drops.
Valve and Zone Layout
Valves control water flow to individual zones. Each zone groups areas with similar watering needs.
A well-designed irrigation blueprint example labels zone numbers clearly.
Sample Irrigation Blueprint Walkthrough
Let’s examine a simplified residential example.
Property Overview
- 10,000 square foot lot
- 6,000 square feet of turf
- 1,500 square feet of planting beds
- Moderate slope in backyard
Step 1: Divide Into Zones
- Zone 1: Front lawn
- Zone 2: Backyard lawn
- Zone 3: Side yard strip
- Zone 4: Shrub beds
- Zone 5: Tree bubblers
Zoning separates plant types and sun exposure levels.
Step 2: Calculate Flow Requirements
Add gallons per minute for each sprinkler in a zone. Ensure total flow stays within water source capacity.
Step 3: Determine Pipe Sizes
Larger pipes reduce friction loss. Pipe diameter must support calculated flow rate.
Step 4: Include Controller and Wiring Layout
Mark controller location. Label wiring paths to each valve.
This irrigation blueprint example demonstrates how planning supports efficient installation.
Hydraulic Calculations in Blueprint Design
This YouTube video below from NSVCad explains a step-by-step hydraulic calculation example based on NFPA 13 standards. It shows how pressure, flow, and pipe sizing are calculated for sprinkler systems. The overview helps readers understand the math behind safe and effective system design.
Hydraulic planning ensures water pressure remains stable.
Flow Rate
Total flow equals the sum of sprinkler demand within one zone.
Pressure Requirement
Each sprinkler requires minimum operating pressure. Account for elevation changes and friction loss.
Total Dynamic Head
Total dynamic head includes:
- Static elevation
- Pipe friction
- Fittings and valves
Proper calculations prevent underperforming zones.
An irrigation blueprint example should always include hydraulic notes for clarity.
Designing for Slopes and Irregular Areas
Slopes require special adjustments.
- Use check valves to prevent drainage
- Install cycle-and-soak scheduling
- Increase sprinkler overlap
Irregular lawns require adjustable arc sprinklers and precise placement.
Including terrain notes in the blueprint improves installation accuracy.
Commercial Blueprint Differences
Commercial properties require expanded documentation.
Additional components include:
- Booster pumps
- Backflow preventers
- Large-diameter mainlines
- Flow sensors
- Central control systems
A commercial irrigation blueprint example often spans multiple pages.
Creating a Downloadable Irrigation Blueprint Template
For practical use, your blueprint should include:
- Scaled grid background
- Zone legend
- Sprinkler symbol key
- Pipe size labels
- Valve numbering
- Water source details
- Pressure calculations
Providing a downloadable template ensures consistency across projects.
Common Blueprint Mistakes to Avoid
Many irrigation failures start in the design phase.
Inaccurate Measurements
Incorrect property dimensions lead to poor spacing.
Ignoring Water Source Capacity
Designing zones beyond available flow creates pressure loss.
Mixing Sprinkler Types in One Zone
Different precipitation rates cause uneven watering.
Failing to Document Wiring
Electrical mapping prevents future confusion.
Avoiding these errors strengthens your irrigation blueprint example and system reliability.
Maintenance Benefits of a Clear Blueprint
Detailed documentation supports long-term care.
Maintenance advantages include:
- Quick valve identification
- Easier leak detection
- Faster system upgrades
- Simplified troubleshooting
A clear irrigation blueprint example protects investment over time.
Practical Tips for Property Owners
Follow these steps before installation:
- Measure accurately
- Confirm water pressure
- Separate plant types into zones
- Choose proper pipe sizes
- Verify hydraulic calculations
- Keep digital and printed copies
Structured planning prevents costly revisions.
FAQs
What is included in an irrigation blueprint?
It includes property layout, sprinkler placement, pipe routing, valves, zones, and hydraulic calculations.
Why is head-to-head coverage important?
It ensures even watering across the entire lawn.
Can homeowners create their own irrigation blueprint?
Yes, with accurate measurements and proper calculations. Professional review is recommended.
How detailed should a blueprint be?
It should include scale, pipe sizes, sprinkler arcs, zone labels, and water source data.
Does every irrigation project need a blueprint?
Yes. Even small projects benefit from clear documentation.
Conclusion
Professional irrigation begins with a clear and accurate design. An irrigation blueprint example shows how careful planning improves performance, efficiency, and longevity. Proper zoning, hydraulic calculations, and layout documentation prevent common installation errors.
Homeowners and property managers who prioritize blueprint design enjoy reliable systems and lower maintenance costs. Invest time in creating a detailed irrigation plan and ensure your landscape receives consistent, efficient watering for years to come.